This tutorial will show you how to add an ATtiny microcontroller to your name tag, giving you the ability to get a variety of different lighting effects, as well as turn the name tag off at the push of a button.
Step 1. Make the New Circuit in EAGLE
This is not a step you actually have to do, as we provide you with an .stl file for printing, but we'll briefly touch on this step so you know how to make and modify this circuit. Figure 1 shows a picture of the ATtiny name tag schematic and board files that we made in EAGLE. For more info on using EAGLE, see our previous "Making an LED Name Tag" tutorial. The circuit consists of four sets of 15 LEDs, each connected to a different output pin from the ATtiny. There is also a pushbutton switch between the ATtiny microcontroller RESET and GND pins to enable switching between various programs in the microcontroller. If you'd like to mess around with the design of this circuit, feel free to download the necessary files here: attiny_nametag_eaglefiles.zip.
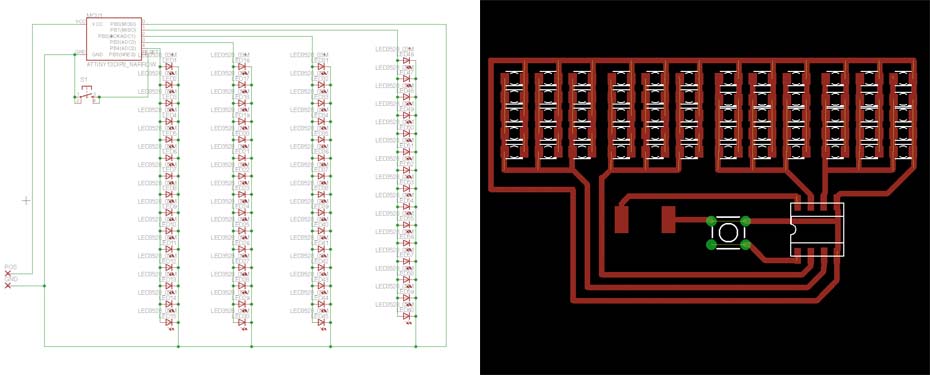
Figure 1. Schematic (left) and Layout (Right) of the ATtiny Name Tag.
Step 2. Convert the Circuit to an .stl File and print.
Following the steps outlined in our "Making an LED Name Tag" tutorial, we converted the .brd file to a png image, and converted this image to an .svg file in Inkscape. Finally, we imported this .svg file into Blender for extrusion in the Z-direction. The basic circuit came out fine, but when we tried to add more virtual blocks of material to hold the pushbutton and ATtiny in place, we had some issues with all the layers showing up in Cura. So instead, we imported the .svg file into Autodesk 123D, another free 3D modeling tool. Figure 2 shows the 2D circuit image and the final 3D model of the circuit in Autodesk. After joining the circuit to the extra 1-mm-thick blocks of material we added, we exported the final 3D model as an .stl file, and loaded it into Cura to convert it into gcode using our Cura printing profile. The ATtiny nametag image, autodesk file, and .stl file are available for download here: attiny_nametag_modelfiles.zip.
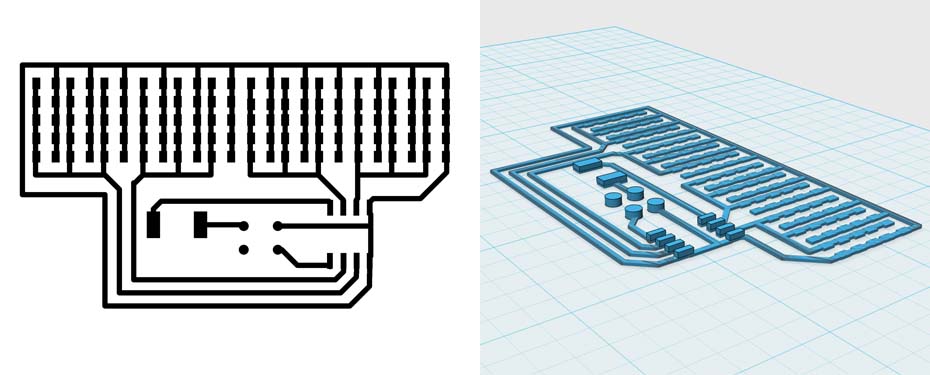
Figure 2. PNG image (Left) and Autodesk 3D Model (Right) of the ATtiny circuit.
Step 3. Program your ATtiny (optional)
We offer ATtiny 13a microcontrollers that come with the name tag program already loaded so that its not necessary to program your own to complete this project. However, if you'd like to buy and program your own, we certainly welcome you to do so. Highlowtech.org has an excellent tutorial that can show you how to program your own ATtiny45, ATtiny85, ATtiny44 or ATtiny84 microcontroller. Unfortunately, these directions don't work with the ATtiny 13a, which is a slightly cheaper microcontroller. There are numerous other tutorials for programming 13a's if you're dead set on using this microcontroller. For example, depending on your operating system and version of Arduino, this instructable may work for you. If you'd like to check out the Arduino sketch we used to program the ATtiny, download it here: arduino_nametag_sketch.zip
Step 4. Assemble the ATtiny name tag.
Figure 3 shows the printed name tag circuit before and after adding the LEDs, battery connector, pushbutton, and ATtiny. The video below shows the operation of the name tag. Similar to the process outlined in this video, we used a solder reflow station to slightly melt the Electrifi filament, allowing us to stick down the components in a matter of minutes. After connecting a lithium ion polymer batter to the circuit, you should be able to cycle through the various effects by pushing down the switch. We added a tiny amount of silver paste down on each ATtiny pad with an needle to improve the electrical contact with the chip and get more consistent performance. Be careful not to make an electrical connection between the two pads when adding silver paste. Here is a list of the things you will need to make this name tag:
1. An ATtiny microcontroller.
2. A pushbutton switch.
3. Silver paste. (This is the best one we can find)
You'll also need the same items that were used for the LED name tag project:
1. Some 3528 LEDs.
2. An Adheisve-backed Pin.
3. A connector or some solid-core wire to connect to a battery.
4. A lithium polymer rechargeable battery. Different batteries seem to come with different connectors, so you can either stick wire into the connector and tape it together, or cutoff the existing connector, strip the ends of the wire, solder a new connector onto the end, and cover the connection with some heat shrink tubing or electrical tape.
5. Wire strippers.
6. A solder reflow station.
7. Tweezers.
8. Tape.
9. A multimeter is also handy but optional.
10. Foam board.
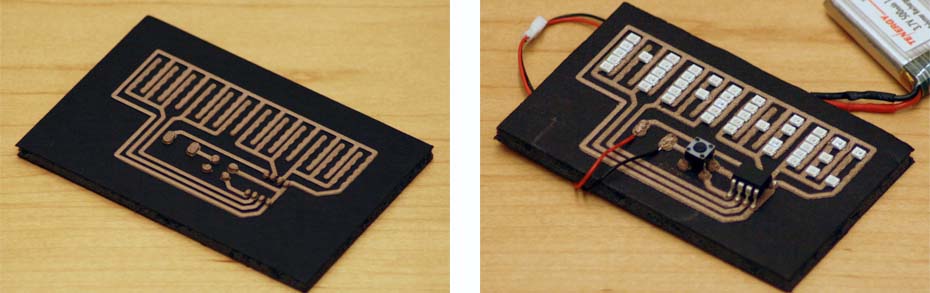
Figure 3. Left: Image of the printed ATtiny nametag circuit. Note the thicker pads for holding the pushbutton and ATtiny in place. Right: Image of final assembled ATtiny nametag.